Motivation
I have been looking into the following problem:
When you have images with quite different scales or resolution, it is not clear to me how well a convnet trained on low resolution images works on high resolution images or vice versa.
Let's take a hypothetical example:
- You train a convnet on relatively large images which contain faces.
- You also have smaller images which are centered around faces.
- If you resize the smaller image to the scale of the larger one, you significantly distort the face and the face still occupies the whole image (unlike the images it was trained on). This may mean poor performance.
To make the smaller image more similar to the large images, I have used the following strategy:
- Do not rescale the face.
- Instead, add borders to the smaller images to match the larger images' size.
- Use inpainting to fill the borders (it won't look natural but it's supposedly better than pure black).
On to a simple example !
For completeness, we'll also compare the speed of OpenCV/scikit-image.
Special dependencies
openCV :
1 | conda install -c menpo opencv3=3.1.0
|
scikit-image
1 | conda install scikit-image
|
The code
We are going to inpaint the following image from the CelebA dataset

Along the way, we'll also test the speed of OpenCV and scikit-image
Simply call:
1 | python <name_of_the_file_you_put_the_code_in>
|
You should get a result looking like this:
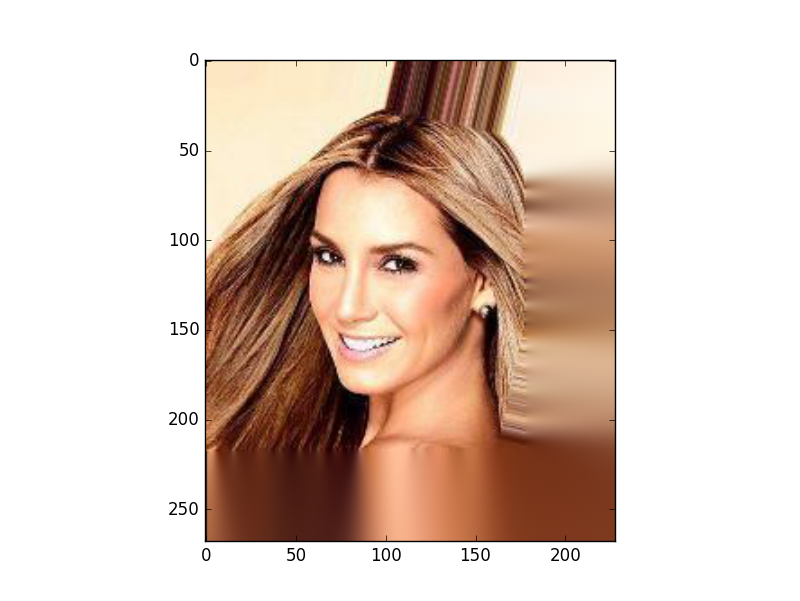
On this task, OpenCV was overwhelmingly faster !
On my machine, I got:
Time inpainting a single image OpenCV: 0.0308220386505
Time inpainting a single image skimage: 85.2677919865
Code below (download the celebA image and name it 000001.jpg)
1 2 3 4 5 6 7 8 9 10 11 12 13 14 15 16 17 18 19 20 21 22 23 24 25 26 27 28 29 30 31 32 33 34 35 36 37 38 39 40 41 42 43 44 45 46 47 48 49 50 51 52 53 54 55 56 57 58 59 60 61 62 63 64 | import numpy as np
import cv2
import matplotlib.pylab as plt
import time
from skimage.restoration import inpaint
from skimage import io
if __name__ == '__main__':
test_img = './000001.jpg'
# Interactive plotting mode
plt.ion()
# Load image
img = cv2.imread(test_img)
# Test load speed
start = time.time()
for i in range(32):
img = cv2.imread(test_img)
print "Time loading 32x times OpenCV:", time.time() - start
# Create a bigger array in which we'll put the umage and then inpaint
arr = np.zeros((img.shape[0] + 50, img.shape[1] + 50, 3))
arr[:img.shape[0], :img.shape[1], :] = img
arr = arr.astype(np.uint8)
# Get the corresponding mask:
# 1 where we need to inpaint, 0 elsewhere
mask = np.zeros(arr.shape[:2]).astype(np.uint8)
mask[img.shape[0]:, :] = 1
mask[:, img.shape[1]:] = 1
# Time inpainting OpenCV
start = time.time()
dst = cv2.inpaint(arr,mask,3,cv2.INPAINT_TELEA)
print "Time inpainting OpenCV:", time.time() - start
# Swap color channels (bgr to rgb)
b,g,r = cv2.split(dst) # get b,g,r
img_inpaint = cv2.merge([r,g,b]) # switch it to rgb
plt.imshow(img_inpaint)
plt.show()
raw_input()
# Test load speed
start = time.time()
for i in range(32):
img = io.imread('./000001.jpg')
print "Time loading 32x times skimage:", time.time() - start
# Create a bigger array in which we'll put the umage and then inpaint
arr = np.zeros((img.shape[0] + 50, img.shape[1] + 50, 3))
arr[:img.shape[0], :img.shape[1], :] = img
arr = arr.astype(np.uint8)
start = time.time()
image_result = inpaint.inpaint_biharmonic(arr, mask, multichannel=True)
print "Time inpainting skimage:", time.time() - start
plt.imshow(image_result)
plt.show()
raw_input()
|
Comments
comments powered by Disqus